

Hello hackers! In this article I will analyze the Petya ransomware that I found while browsing my social networks. Hope you like the article.
What is Petya ransomware?
Petya is a family of encryption malware that was first discovered in 2016. The malware targets Microsoft’s Windows-based systems. Its purpose is to infect the MBR with malicious code that will prevent the system from booting, blocking the system from booting. The unlocking is done through a key that is given to the victim after paying the ransom for their data.
How did I find it?
On the day, I opened Discord and received messages from some friends of mine saying that a server of “hackers” (script kiddies) were infecting random people for no purpose. One of them sent the malware for me to analyze, I didn’t know what it was.
Analyzing the malware

The malware was in a passwordless ZIP file, so I extracted it to a folder and started my analysis.

Looking at the executable strings, I found some interesting things like PhysicalDrive, GetDiskFreeSpaceExAm shutdown.exe and others, it’s worth remembering that I didn’t know what the executable was about, but when I saw the string “PhysicalDrive0” I remembered an attack called Master Boot record (MBR) Overwrite, which consists of changing the system’s boot sector to a malicious payload. In my studies of C and Assembly, I had already created a binary that made this attack on a Linux machine, whoever is interested just access this link.
So I threw the malware to Ghidra for further analysis.
 Within Ghidra, I found the main functionality called “entry”, it was the only interesting one, the malware only had this function.

Analyzing the decompile, I saw that the executable called the “CreateFileA” function of fileapi.h that pointed to “PhysicalDrive0”, not only it but like the others. This function was used to access the target’s HDD/SSD partitions in order to be able to change them in the future.

Rename the variables to get a better view of the code. A few lines below, it was possible to find other functionalities such as “WriteFile”, “CloseHandle” and “WinExec”.

The WriteFile function was the one that did all the magic. Looking at this line, we notice that drive1 is added to it, and consequently something unknown (&DAT_004117a4) is added to the function. I could understand that the unknown value would be written to drive1, that is, maybe the malicious code is written in that partition.
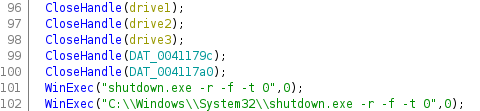
After replacing the bytes of each partition, the malware closed the partitions and then executed a command to call the executable “shutdown.exe” to restart the computer (because it used the “-r” flag).
From line 102 onwards, it made no sense for the malware to continue acting, as the infected computer would restart. So I needed to find out what that unknown value (&DAT_004117a4) was that was added in the WriteFile function. So I created a Windows virtual machine with a debugger installed to start looking for this value.
Inside the debugger, I found the WriteFile function call and started looking for the unknown value.
I found the three times the WriteFile function is called. We noticed that some values are pushed to the stack stack, values such as “8000” which is the same value found when analyzing by Ghidra.

The red underlined string is responsible for the unknown value.


Following her path, we found some bytes, they were used at the time of overwriting each partition. The factor that made me conclude that this was the payload was the simple fact that it contains the values “55 AA” (or known as 0x55AA), used at the end of the boot code to sign the MBR.
In my 16-bit assembly studies, I often use it in my code.

Knowing that this was the payload, I copied all the bytes and passed it to my Linux machine to analyze. First I checked the file using the “file” command to make sure it was a payload for MBR.

I concluded that it really was a payload for the MBR. The next step would be to emulate the malicious code to see what appeared on the victim’s computer after overwriting the partition and restarting the machine, I used the QEMU tool to do this task.

Upon execution I recognized the executable, it was the Petya ransomware.

In the ransomware message itself there was the name of the two authors, Yamashita and Dressc0de. There was no message about any payment to make the ransom, it seemed that they just wanted to destroy the victims’ computer for fun. But there was a key to unlock and gain access to the machine, so I started looking for the key. I started by looking for some executable string that contained the unlock key.

I noticed that there was a random string and thought it was the key, so with the emulator open, I typed in the possible key.


And that string really was the ransomware’s key. So I infected my Windows virtual machine and typed this key, but after restarting the computer, I realized that it was no use, as the files had been deleted.
A question arose, “how did they recreate this ransomware?”. With part of the code decompiled by Ghidra, I started to recreate the ransomware to base as much as possible with the original code to do a future search for the original code.


These would be the parts of the code that would be remastered.


I did a remaster of the ransomware code and this was the result.
After remastering, I looked for some code similar to these on the internet, and I found a repository on Github. Look at the Github code and the remastered code.
Github code:

Remasterizade code:

What it didn’t have in the remastered code that exists in the code on Github is the “memcpy” function and some variables with pointers using the “malloc” function, maybe that’s why the decompiled code of Ghidra has a few more lines below each variable of apportionment.

This code on Github was a Petya builder, that is, the malware authors just used a tool to create and recreate the malware automatically, do you understand why I called them “hackers”?

Well, it was fun to analyze the malware.
To the next!